How authentication works
The Iconik API authenticates every request with a JSON Web Token (JWT). What a token may do is decided by two things: the user it acts as, and the application it was issued to. The user's roles and ACLs decide which actions the request is allowed to perform. The application is a record an administrator creates under Admin > Settings > Application Tokens, and it decides how Iconik issues the token and how long it lives.
When you add an application, the first step asks what you are building. That choice sets how the application authenticates, and it cannot be changed later.
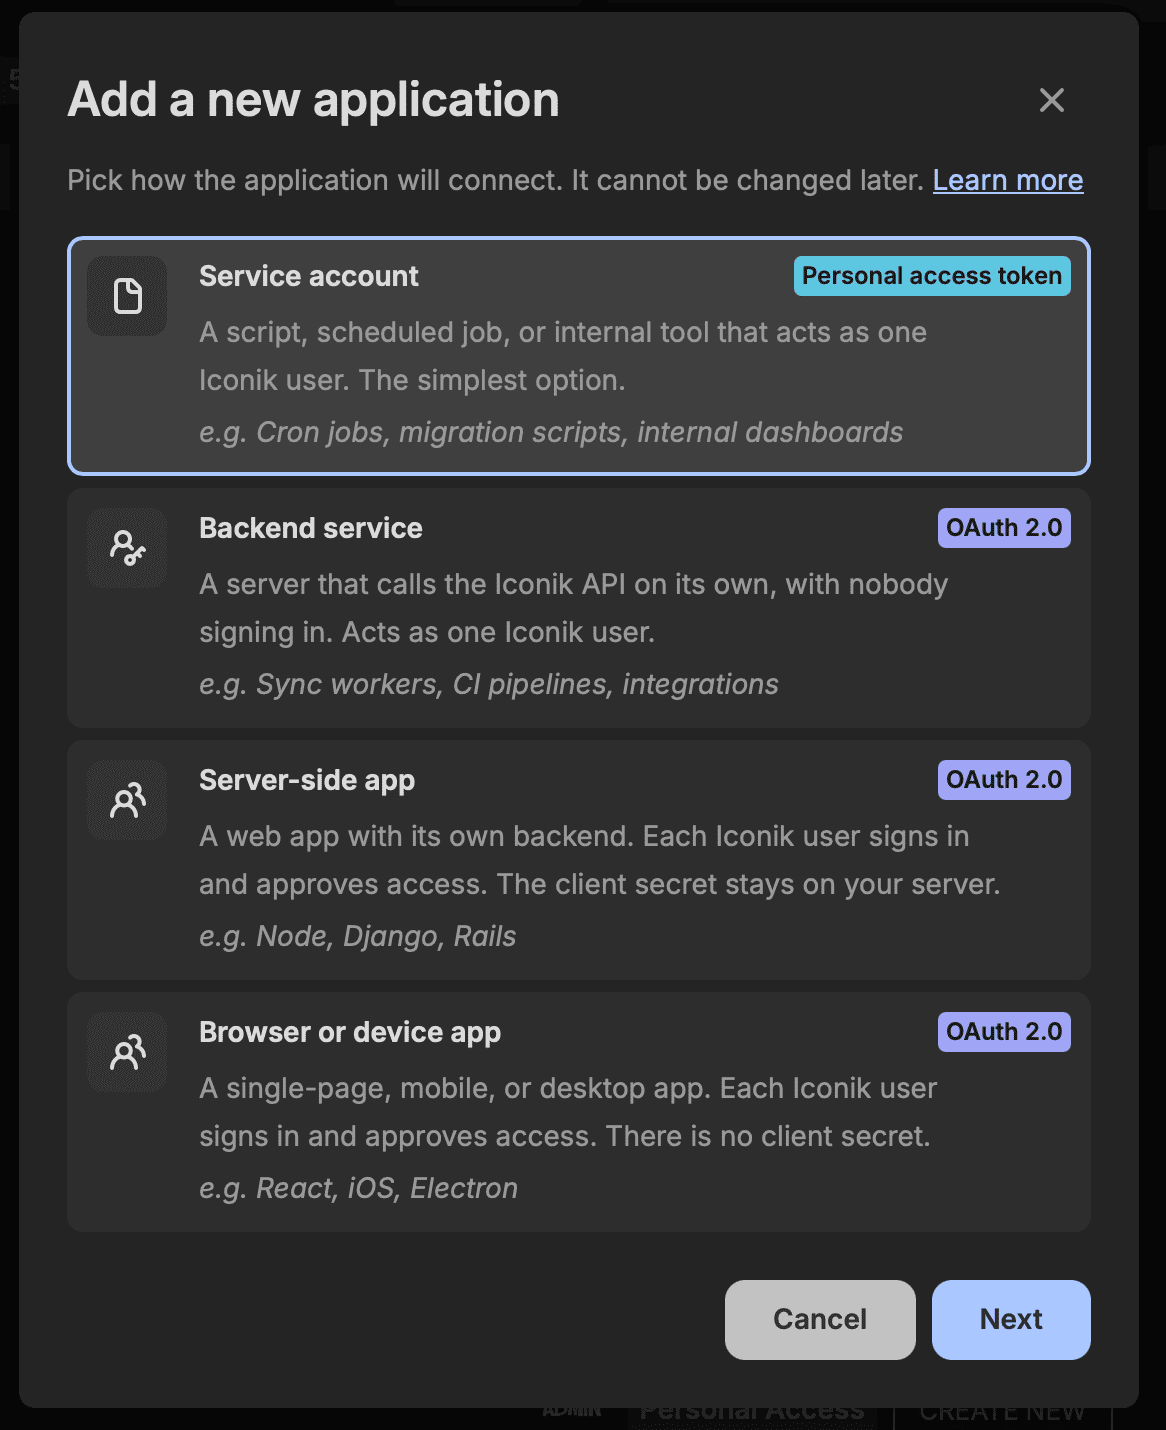
- Service account
- A script, scheduled job, or internal tool that acts as one Iconik user. It authenticates with a personal access token, a long-lived token minted for the user you pick when creating the application. The simplest option. Cron jobs, migration scripts, internal dashboards.
- Backend service
- A server that calls the API on its own, with nobody signing in, still acting as one Iconik user. It authenticates with OAuth 2.0 client credentials: the server trades its client secret for short-lived, scoped access tokens. Sync workers, CI pipelines, integrations.
- Server-side app
- A user-facing web app with its own backend. Each Iconik user signs in and approves access, and the app acts as that user. It uses the OAuth 2.0 authorization code flow as a confidential client, so the client secret stays on your server. Node, Django, Rails.
- Browser or device app
- A single-page, mobile, or desktop app. Each Iconik user signs in and approves access. It uses the same authorization code flow as a public client, with PKCE and no client secret. React, iOS, Electron.
The two credential types differ in lifetime and reach. A personal access token lives for years and carries everything its user can do. An OAuth access token lives for hours, is limited to the scopes the application was granted, and a refresh token renews it. Both are JWTs signed by Iconik, and both are sent in the same header, so the code that makes API calls does not need to know which one it holds.
Creating an application
Sign in as an administrator, open Admin > Settings > Application Tokens, and click New application. Pick the scenario, click Next, and fill in the fields for it. Which fields appear depends on the scenario:
- Name
- Required for every scenario. Use a name that says what the application is for, such as Nightly archive sync. For OAuth applications this is what users see on the consent screen.
- Acts as user
- Every request from the application is made as this user, with that user's roles and permissions. Required for a Backend service, optional for a Service account, and not shown for the two scenarios where a user signs in, since those applications only ever act as the user who approved them. Locked after creation.
- Scopes
- What the application is allowed to do. Required for every OAuth scenario, picked from a fixed list. The application can never do more than the user who approves it. See Scopes.
- Redirect URIs
- Where Iconik may send the browser after a user approves access. Required for
Server-side and Browser or device apps. Matching is exact, including scheme, port, and path, so
register the full callback URL such as
https://example.com/callback, and addhttp://localhost:5173/callbackor similar for local development. The dialog checks that each entry is a full URL and drops blank rows. - Allowed origins
- Browser origins allowed to call the API with this application's tokens. Optional, Browser or device apps only. Set it to your page's origin if the app calls Iconik from JavaScript; otherwise the browser's CORS check blocks the calls.
Click Create. The final step shows the Application ID and, for a Backend service or Server-side app, the client secret, each with a copy button. This is the only time the client secret is shown. Copy it now and store it somewhere safe. If you lose it, create a new application.
A Service account has no credential at this point. You create its personal access token from the applications list; see the next section.
Creating an application with the API
The same record can be created with POST /API/auth/v1/apps/, which is handy when you
provision integrations from a script. The call needs an administrator's credentials. The scenario maps
to two fields:
- Service account
"type": "PAT"- Backend service
"type": "OAUTH","oauth_client_type": "confidential", withdefault_user_idset- Server-side app
"type": "OAUTH","oauth_client_type": "confidential"- Browser or device app
"type": "OAUTH","oauth_client_type": "public"
The remaining fields are name, default_user_id, allowed_scopes,
redirect_uris, and allowed_origins, following the same rules as the dialog. A
Server-side app, for example:
curl -X POST https://app.iconik.io/API/auth/v1/apps/ \
  -H 'Authorization: Bearer ADMIN-TOKEN' \
  -H 'Content-Type: application/json' \
  -d '{
    "name": "Review portal",
    "type": "OAUTH",
    "oauth_client_type": "confidential",
    "allowed_scopes": ["assets:read", "collections:read"],
    "redirect_uris": ["https://review.example.com/callback"]
  }'
import requests
r = requests.post(
'https://app.iconik.io/API/auth/v1/apps/',
headers={'Authorization': 'Bearer ADMIN-TOKEN'},
json={
'name': 'Review portal',
'type': 'OAUTH',
'oauth_client_type': 'confidential',
'allowed_scopes': ['assets:read', 'collections:read'],
'redirect_uris': ['https://review.example.com/callback'],
},
)
print(r.status_code)
print(r.json())const response = await fetch('https://app.iconik.io/API/auth/v1/apps/', {
method: 'POST',
headers: {
Authorization: 'Bearer ADMIN-TOKEN',
'Content-Type': 'application/json',
},
body: JSON.stringify({
name: 'Review portal',
type: 'OAUTH',
oauth_client_type: 'confidential',
allowed_scopes: ['assets:read', 'collections:read'],
redirect_uris: ['https://review.example.com/callback'],
}),
});
console.log(response.status);
console.log(await response.json());The response carries the application's id, which is the Application ID and, for OAuth,
the client_id. For confidential clients it also carries client_secret, and
Iconik returns it only in this response. Edit an application with
PATCH /API/auth/v1/apps/{app_id}/. The API silently ignores type there,
but it does accept oauth_client_type and default_user_id, unlike the
dialog, so leave them out unless you mean to change how the application authenticates.
Service account: personal access tokens
A personal access token is a credential for the user the Service account acts as. Requests made with it are indistinguishable from that user working in the web UI, so create a dedicated user for the integration and give that user only the groups and roles the job needs. Tokens bound to an administrator account are the most common way an integration ends up with far more power than it should have.
Create a token
In the applications list, find the Service account and click Create new in the Token column. The token is shown once. Iconik stores only enough to verify it, so it cannot be displayed again. Copy it into a password manager together with the Application ID. If you lose it, create a new token for the same application and revoke the old one.
Over the API, the same thing is a POST to the application's token endpoint. The application must have an acting user, that user must be active, and the caller must be an administrator or that same user.
curl -X POST https://app.iconik.io/API/auth/v1/apps/APP-ID/token/ \
  -H 'Authorization: Bearer ADMIN-TOKEN'
import requests
r = requests.post(
'https://app.iconik.io/API/auth/v1/apps/APP-ID/token/',
headers={'Authorization': 'Bearer ADMIN-TOKEN'},
)
print(r.status_code)
print(r.json())const response = await fetch('https://app.iconik.io/API/auth/v1/apps/APP-ID/token/', {
method: 'POST',
headers: { Authorization: 'Bearer ADMIN-TOKEN' },
});
console.log(response.status);
console.log(await response.json());{
"token": "eyJhbGciOiJIUzI1NiIs...",
"id": "6e1b4c60-5678-11ef-9d3a-0242ac120002",
"app_id": "APP-ID",
"user_id": "1c9a2f3e-1234-11ef-8b2a-0242ac120002",
"expires": "2036-07-01T09:14:22.000000+00:00",
"is_admin": false,
...
}Add ?expires_in=3600 (seconds) to get a shorter-lived token. The value is capped at the
system default of ten years.
Make a request
Send the token as a bearer token:
curl https://app.iconik.io/API/files/v1/storages/ \
  -H 'Authorization: Bearer TOKEN'
import requests
r = requests.get(
'https://app.iconik.io/API/files/v1/storages/',
headers={'Authorization': 'Bearer TOKEN'},
)
print(r.status_code)
print(r.json())const response = await fetch('https://app.iconik.io/API/files/v1/storages/', {
headers: { Authorization: 'Bearer TOKEN' },
});
console.log(response.status);
console.log(await response.json());Older integrations send the Application ID and the token as two separate headers. That form is still accepted everywhere:
curl https://app.iconik.io/API/files/v1/storages/ \
  -H 'App-ID: APP-ID' \
  -H 'Auth-Token: TOKEN'
import requests
r = requests.get(
'https://app.iconik.io/API/files/v1/storages/',
headers={'App-ID': 'APP-ID', 'Auth-Token': 'TOKEN'},
)const response = await fetch('https://app.iconik.io/API/files/v1/storages/', {
headers: { 'App-ID': 'APP-ID', 'Auth-Token': 'TOKEN' },
});Check, list, and revoke
To find out whether a token is still valid, call the token endpoint with it. A 200 returns the token's details, including its expiry and the user it acts as. A 401 means it has expired or been revoked.
curl https://app.iconik.io/API/auth/v1/auth/token/ \
  -H 'Authorization: Bearer TOKEN'
import requests
r = requests.get(
'https://app.iconik.io/API/auth/v1/auth/token/',
headers={'Authorization': 'Bearer TOKEN'},
)
print(r.status_code)
print(r.json())const response = await fetch('https://app.iconik.io/API/auth/v1/auth/token/', {
headers: { Authorization: 'Bearer TOKEN' },
});
console.log(response.status);
console.log(await response.json());Revocation takes effect immediately, since Iconik looks the token up on every request rather than
trusting the signature alone. A token can revoke itself with DELETE /API/auth/v1/auth/token/.
An administrator can list an application's tokens with
GET /API/auth/v1/auth/{app_id}/tokens/ and revoke any one of them with
DELETE /API/auth/v1/auth/token/{token_id}/. Deleting the application from the
Application Tokens page is the fastest way to cut off an integration entirely.
OAuth 2.0
Iconik is an OAuth 2.0 authorization server for applications registered in a domain. It supports
three grants: client credentials for a Backend service, the authorization code grant with PKCE for
Server-side and Browser or device apps, and the refresh token grant. PKCE is mandatory, only the
S256 challenge method is accepted, and there is no implicit flow.
Both the application and the user approving it must belong to the same Iconik domain. If you ship a plugin to many customers, each customer registers your application in their own domain and hands you its client ID. Scopes narrow, they never widen. A request is allowed only if the application's scopes, the user's roles, and the ACLs on the entity all permit it, so an application cannot do anything its user could not do in the web UI.
Scopes
A scope is a named bundle of Iconik roles. The permissions of a request are the result of applying the application's scopes, the user's roles, and the ACLs on the entity. All three have to allow it. The scopes are picked from a fixed list when the application is created, and the same wording appears on the consent screen the user sees:
assets:read- Read your assets. Search, and read assets, files, formats, proxies, versions, metadata, jobs, transfers, and shares.
assets:write- Create and modify your assets. Create and update assets, upload, create formats and versions, edit metadata, create transcode jobs and shares.
assets:delete- Delete your assets. Delete and purge assets, files, formats, versions, and related metadata.
collections:read- Read your collections. Search, and read collections, portfolios, metadata, and shares.
collections:write- Create and modify your collections. Create and update collections and portfolios, edit their metadata, create shares.
collections:delete- Delete your collections. Delete and purge collections and portfolios.
user_impersonation- Act as you across all of Iconik. No role bundle: the token can do everything the signed-in user can, the same reach as a personal access token, but with a short-lived token that is refreshed instead of one that lives for years. Meant for internal applications. Do not request it from an application that other organisations install.
Scopes are space-separated in requests, for example assets:read collections:read. A
request may ask for any subset of the application's scopes and nothing outside them. The list a
platform supports is at GET /API/auth/v1/apps/oauth_scopes/. Ask for the narrowest set
that does the job.
Backend service: client credentials
A Backend service gets a token with no user present. The token acts as the user configured on the application, limited to the requested scopes, and comes without a refresh token: when it expires, ask for another.
curl -X POST https://app.iconik.io/API/auth/v1/oauth/token/ \
  -H 'Content-Type: application/x-www-form-urlencoded' \
  -d grant_type=client_credentials \
  -d client_id=CLIENT-ID \
  -d client_secret=CLIENT-SECRET \
  -d 'scope=assets:read'
import requests
r = requests.post(
'https://app.iconik.io/API/auth/v1/oauth/token/',
data={
'grant_type': 'client_credentials',
'client_id': 'CLIENT-ID',
'client_secret': 'CLIENT-SECRET',
'scope': 'assets:read',
},
)
print(r.status_code)
print(r.json())const response = await fetch('https://app.iconik.io/API/auth/v1/oauth/token/', {
method: 'POST',
headers: { 'Content-Type': 'application/x-www-form-urlencoded' },
body: new URLSearchParams({
grant_type: 'client_credentials',
client_id: 'CLIENT-ID',
client_secret: 'CLIENT-SECRET',
scope: 'assets:read',
}),
});
console.log(response.status);
console.log(await response.json());The client secret can also be sent as HTTP Basic credentials, client_id:client_secret,
instead of in the form. Leave out scope to receive every scope the application is
allowed. The response is the same token response shown below, without a
refresh_token. Compared with a personal access token, this gives you short-lived
credentials and scope limits at the cost of fetching a new token when the old one expires.
Server-side and Browser or device apps: authorization code with PKCE
This is the flow for anything a person signs in to. Your app never sees the user's password, and a Browser or device app never holds a secret. The steps:
- Generate PKCE values. Create a random
code_verifier(43 to 128 characters of unreserved URL characters), and derivecode_challengeas the base64url encoding of its SHA-256 hash, without padding. Also generate a randomstateand keep both in memory. - Send the user to the consent page. Open this URL in the browser, or a popup
window:
If the user is not signed in, Iconik signs them in first and returns them here. They see your application's name, the scopes in the wording above, and Allow and Deny buttons.https://app.iconik.io/oauth/authorize ?client_id=CLIENT-ID &redirect_uri=https%3A%2F%2Fexample.com%2Fcallback &scope=assets%3Aread%20collections%3Aread &response_type=code &code_challenge=CODE-CHALLENGE &code_challenge_method=S256 &state=STATE - Receive the code. On Allow, the browser is redirected to your
redirect_uriwithcodeandstatein the query string. On Deny, it arrives witherror=access_deniedandstate. Reject the response ifstatedoes not match what you sent. The code is single-use and expires after 60 seconds, so exchange it right away. - Exchange the code for tokens. A form-encoded POST from your app. The
redirect_urimust be the same string you used in step 2.curl -X POST https://app.iconik.io/API/auth/v1/oauth/token/ \ -H 'Content-Type: application/x-www-form-urlencoded' \ -d grant_type=authorization_code \ -d client_id=CLIENT-ID \ -d code=CODE \ -d code_verifier=CODE-VERIFIER \ -d redirect_uri=https://example.com/callbackimport requests r = requests.post( 'https://app.iconik.io/API/auth/v1/oauth/token/', data={ 'grant_type': 'authorization_code', 'client_id': 'CLIENT-ID', 'code': 'CODE', 'code_verifier': 'CODE-VERIFIER', 'redirect_uri': 'https://example.com/callback', }, ) print(r.status_code) print(r.json())A Server-side app also authenticates here, by addingconst response = await fetch('https://app.iconik.io/API/auth/v1/oauth/token/', { method: 'POST', headers: { 'Content-Type': 'application/x-www-form-urlencoded' }, body: new URLSearchParams({ grant_type: 'authorization_code', client_id: 'CLIENT-ID', code: 'CODE', code_verifier: 'CODE-VERIFIER', redirect_uri: 'https://example.com/callback', }), }); console.log(response.status); console.log(await response.json());client_secretto the form or sendingclient_id:client_secretas HTTP Basic credentials. A Browser or device app sends the form as shown.
The response is a standard token response:
{
  "access_token": "eyJhbGciOiJIUzI1NiIs...",
  "token_type": "Bearer",
  "expires_in": 43200,
  "refresh_token": "eyJhbGciOiJIUzI1NiIs...",
  "scope": "assets:read collections:read"
}
Access tokens are short-lived on purpose, 12 hours by default. Read expires_in
rather than hard-coding it. Refresh tokens last 60 days by default and are rotated on every use; see
Refreshing.
Browser and plugin apps
If your app runs in a browser, a desktop host, or a plugin environment, run the consent page in a
popup and have the callback page hand the code back to the opener with postMessage. Open
the popup synchronously inside the click handler and navigate it once the PKCE challenge is ready;
Safari blocks popups opened after an await. Check the message's origin, and treat a
closed popup as a cancelled sign-in rather than an error. Set the application's allowed origins to
the page's origin so the API accepts the browser's calls, and keep the access and refresh tokens in
storage your host provides rather than in cookies.
A minimal sketch of the client side in browser JavaScript, without the popup plumbing:
const encoder = new TextEncoder();

function base64url(bytes) {
  return btoa(String.fromCharCode(...bytes))
    .replace(/\+/g, '-')
    .replace(/\//g, '_')
    .replace(/[=]+$/, '');
}

function randomString(byteLength) {
  const bytes = crypto.getRandomValues(new Uint8Array(byteLength));
  return base64url(bytes);
}

async function pkce() {
  const verifier = randomString(64);
  const data = encoder.encode(verifier);
  const digest = await crypto.subtle.digest('SHA-256', data);
  return { verifier, challenge: base64url(new Uint8Array(digest)) };
}

async function exchangeCode(baseUrl, clientId, params) {
  const { code, verifier, redirectUri } = params;
  const response = await fetch(`${baseUrl}/API/auth/v1/oauth/token/`, {
    method: 'POST',
    headers: { 'Content-Type': 'application/x-www-form-urlencoded' },
    body: new URLSearchParams({
      grant_type: 'authorization_code',
      client_id: clientId,
      code,
      code_verifier: verifier,
      redirect_uri: redirectUri,
    }),
  });
  if (!response.ok) {
    throw new Error(`Token exchange failed: ${response.status}`);
  }
  const data = await response.json();
  return {
    accessToken: data.access_token,
    refreshToken: data.refresh_token,
    expiresAt: Date.now() + data.expires_in * 1000,
  };
}
Refreshing
Use the refresh token grant to get a new access token when the old one is near expiry. Refreshing a few seconds early avoids a failed request in the gap.
curl -X POST https://app.iconik.io/API/auth/v1/oauth/token/ \
  -H 'Content-Type: application/x-www-form-urlencoded' \
  -d grant_type=refresh_token \
  -d client_id=CLIENT-ID \
  -d refresh_token=REFRESH-TOKEN
import requests
r = requests.post(
'https://app.iconik.io/API/auth/v1/oauth/token/',
data={
'grant_type': 'refresh_token',
'client_id': 'CLIENT-ID',
'refresh_token': 'REFRESH-TOKEN',
},
)
print(r.status_code)
print(r.json())const response = await fetch('https://app.iconik.io/API/auth/v1/oauth/token/', {
method: 'POST',
headers: { 'Content-Type': 'application/x-www-form-urlencoded' },
body: new URLSearchParams({
grant_type: 'refresh_token',
client_id: 'CLIENT-ID',
refresh_token: 'REFRESH-TOKEN',
}),
});
console.log(response.status);
console.log(await response.json());A Server-side app authenticates the same way as at the token exchange. Pass scope to
narrow the new token; a broader scope than the original grant is rejected.
Every refresh token is single-use. The response carries a new one, and the one you sent is dead. Persist the new refresh token before you do anything else with the response. If Iconik sees a used refresh token again, it treats that as theft and revokes the whole chain descended from the original sign-in, so the legitimate holder is signed out too. Two consequences for your code: serialize refreshes so that concurrent requests share one in-flight refresh instead of racing, and if several tabs or windows share a stored token, take a lock (the Web Locks API works well) and re-read storage before refreshing, because another context may already have rotated it.
A refresh that fails with invalid_grant is final: the token expired, was revoked, or
was replayed. Clear your stored tokens and send the user back through the consent page. A 503 with
temporarily_unavailable is Iconik's fault, and a retry after a short delay is the right
response.
To sign a user out on your side, discard both tokens. To revoke the refresh token on Iconik's side as
well, send it in a JSON body to DELETE /API/auth/v1/refresh/token/.
Using the access token
Send it as a bearer token:
curl https://app.iconik.io/API/search/v1/search/ \
  -H 'Authorization: Bearer ACCESS-TOKEN' \
  -H 'Content-Type: application/json' \
  -d '{"doc_types": ["assets"], "query": "interview"}'
import requests
r = requests.post(
'https://app.iconik.io/API/search/v1/search/',
headers={'Authorization': 'Bearer ACCESS-TOKEN'},
json={'doc_types': ['assets'], 'query': 'interview'},
)
print(r.status_code)
print(r.json())const response = await fetch('https://app.iconik.io/API/search/v1/search/', {
method: 'POST',
headers: {
Authorization: 'Bearer ACCESS-TOKEN',
'Content-Type': 'application/json',
},
body: JSON.stringify({ doc_types: ['assets'], query: 'interview' }),
});
console.log(response.status);
console.log(await response.json());A 401 means the token expired or was revoked. Refresh once and retry the request. If the retry also fails, sign the user out. A 403 with a valid token means the user does not have the role or ACL for that entity, or the application's scopes do not cover the endpoint. Scope problems show up as 403 on endpoints that the same user can reach in the web UI; the fix is to request a wider scope at sign-in, within what the application is allowed.
Errors
The token endpoint uses standard OAuth error bodies:
{
  "error": "invalid_scope",
  "error_description": "This app is not allowed to request: assets:delete. App-allowed scopes are: assets:read assets:write"
}invalid_client- Unknown
client_id, wrong secret, or a public client trying to use client credentials. invalid_grant- The code or refresh token is expired, used, revoked, or the
redirect_uriorcode_verifierdoes not match. invalid_scope- A scope the platform does not know, or one outside the application's scopes. The description lists what is allowed.
unauthorized_client- The application is a Service account. Personal access token applications cannot use the OAuth endpoints.
The consent page reports problems with the authorization request itself (a redirect URI that is not
registered, a missing code_challenge) to the user before anything is redirected, so your
callback only ever receives a code or error=access_denied.
Endpoint summary
All paths are relative to https://app.iconik.io. Full parameter lists are in the
auth service specification.
POST /API/auth/v1/apps/- Create an application of any scenario. Administrators only.
PATCH /API/auth/v1/apps/{app_id}/- Edit name, scopes, redirect URIs, and allowed origins.
GET /API/auth/v1/apps/oauth_scopes/- Scopes this platform supports.
POST /API/auth/v1/apps/{app_id}/token/- Mint a personal access token for a Service account.
GET /API/auth/v1/auth/token/- Validate the presented token and return its details.
DELETE /API/auth/v1/auth/token/- Revoke the presented token.
GET /API/auth/v1/auth/{app_id}/tokens/- List an application's tokens. Administrators only.
DELETE /API/auth/v1/auth/token/{token_id}/- Revoke a token by ID.
GET /oauth/authorize- The consent page, served by the web app. Where you send the user.
GETandPOST /API/auth/v1/oauth/authorize/- What the consent page calls:
GETdescribes the pending grant,POSTrecords the user's decision and issues the code. You do not call these directly. POST /API/auth/v1/oauth/token/- Token endpoint for the
authorization_code,client_credentialsandrefresh_tokengrants. DELETE /API/auth/v1/refresh/token/- Revoke a refresh token. JSON body with
refresh_token.
Keeping credentials safe
A personal access token is a password for a user. A client secret is a password for your application. Treat them that way: one application per integration, never in source control, rotated when someone with access leaves. Browser or device apps should not embed anything secret at all, which is the point of PKCE. Refresh tokens deserve the same care as passwords too, since one refresh token is a session that lasts for weeks. The security guidelines go into more detail.